Introduction
Just recently we were tasked with developing a web + iOS app for a client. We wanted to leverage the speed & simplicity of building for the web using Laravel, but utilize this same backend architecture for the iOS app. This meant we needed to create a RESTful API to interact with our iOS app.
As with most apps, this one required authentication. We decided to use tokens for our authentication module. This article is apart of a two part series designed to demonstrate how to build a basic API which will eventually interact with an iOS to-do app. It will then demonstrate how to connect the iOS app & API using a token authentication system (via JSON).
This particular article will cover the API that runs behind the scenes. We will be posting a follow up article in the coming weeks that covers the actual iOS development.
Our goals for this app are to create an API which will allow us to:
- Login
- Verify a token
- Get / Add / Delete to-do items
The tools we will use:
- Laravel - version 4.2
- Dingo - RESTful API package
- JWT Auth - JSON web token auth (works well with Dingo)
As always, we encourage you to check out the code on our Github. It may be helpful to follow along this way.
Basic Framework
I'll assume that you already have a standard installation of Laravel 4.2 up and running. If you need to do that first, their site provides a great quickstart guide.
Configure Dingo & JWT Auth
Add both these packages to your composer.json file:
"dingo/api": "0.8.*",
"tymon/jwt-auth": "0.4.*"
Then run composer update to grab the repository files.
dingo/api
We strongly recommend that you read the wiki for this plugin. Here is a quick summary of how to get things up and running:
- Configure the Provider & Alias inside
app/config/app.php - Publish the package configuration file by running
php artisan config:publish dingo/api - Set the prefix variable to api.
- Add JSON web tokens as an authentication provider inside your app/config/packages/dingo/config.php file. The auth array should then look something like this:
'auth' => [
    'basic' => function ($app) {
        return new Dingo\Api\Auth\BasicProvider($app['auth']);
    },
    'jwt' => function ($app) {
        return new Dingo\Api\Auth\JWTProvider($app['tymon.jwt.auth']);
    }
],
jwt-auth
The developer for this plugin has a nice getting started guide that walks you through installation.
Database Design
Our goal is to build a to-do list module with authentication. Let's create the necessary tables.
lists
This table contains the master lists for our users. We can identify the list owner using the user_id column.
todos
This table contains all the child list items (also know as to-do items). We can identify the parent list using the list_id column.
users
This table will save all the users login information.
We can create all three tables by writing and running a migration. Run the artsian command php artisan migrate:make todo_data_structure
Then add the following inside the newly created TodoDataStructure class:
public function up() {

    Schema::create('lists', function(Blueprint $table) {
        $table->increments('id');
        $table->integer('user_id');
        $table->string('title');
        $table->timestamps();
    });

    Schema::create('todos', function(Blueprint $table) {
        $table->increments('id');
        $table->integer('list_id');
        $table->string('title');
        $table->timestamps();
    });

    Schema::create('users', function(Blueprint $table) {
        $table->increments('id');
        $table->string('email')->unique();
        $table->string('password');
        $table->timestamps();
    });

}

public function down() {
    Schema::drop('lists');
    Schema::drop('todos');
    Schema::drop('users');
}
Setup Models
We will setup 3 models to interact with the API routes and database: User, Todo, TodoList. Add the following to your existing models/User.php file:
public function lists() {
    return $this->hasMany('TodoList', 'user_id');
}
Create a new file models/Todo.php and add the following:
<?php

class Todo extends Eloquent {

  protected $fillable = ['list_id', 'title'];
  protected $table = 'todos';

  // Get the list of this todo
  public function todoList(){
    return $this->belongsTo('TodoList', 'list_id');
  }

}
Create a new file models/TodoList.php and add the following:
<?php

class TodoList extends Eloquent {

  protected $fillable = ['user_id', 'title'];
  protected $table = 'lists';

  // Get the todos from this list
  public function todos(){
    return $this->hasMany('Todo', 'list_id');
  }

}
Configure API Routes
At this point you now have a base skeleton for the application up and running. Now its time to code the API routes. We will create an api array inside the routes file. This will allow us to protect a route with an auth token by simply adding the 'protected' => true parameter. The api array will look like this:
Route::api('v1', function () {
});
Login & Validate Token
In order to properly use the token authentication, we will need to code a couple of routes: login and validate_token. The login route will give us a valid token if our user and password is correct. Otherwise, it will just throw an error. Place these routes inside your api array:
Route::post('login', [
    'uses'      => 'AuthenticateController@authenticate',
    'as'        => 'api.login'
]);
The validate_token route will check that the token we saved is still valid. We will verify the token everytime the app is opened:
Route::get('validate_token',  array(
    'protected' => true,
    'as'        =>  'api.validate_token',
    'uses'        => 'AuthenticateController@validateToken'
));
Todo Routes
And finally a the routes for viewing, adding and deleting Todos from each user's list:
Route::get('todo', [
    'uses'      => 'TodoController@index',
    'as'        => 'todo.index',
    'protected' => true
]);

Route::post('todo', [
    'uses'      => 'TodoController@store',
    'as'        => 'todo.store',
    'protected' => true
]);

Route::delete('todo/{id}', [
    'uses'      => 'TodoController@destroy',
    'as'        => 'todo.destroy',
    'protected' => true
]);
Controllers
Let's code the methods for our controllers: AuthController and TodoController.
AuthController
This particular controller will need two methods. First, the authenticate method will verify the user email and password. If the credentials are valid it will generate a token and return it as JSON. If the credentials are not valid it will return a 401 error with the message "invalid_credentials".
Second, the validate_token method is used to verify the validity of the token. If the token is still valid it will return a success message. If the token is not valid, it will return an error exception based on the JWT errors.
To accomplish this we will create a new file controllers/AuthenticateController.php and put the following code in it:
<?php
use Tymon\JWTAuth\Exceptions\JWTException;

class AuthenticateController extends \BaseController{

  public function authenticate() {

    // Get credentials from the request
    $credentials = Input::only('email', 'password');

    try {
      // Attempt to verify the credentials and create a token for the user.
      if (! $token = JWTAuth::attempt($credentials)) {
        return API::response()->array(['error' => 'invalid_credentials'])->statusCode(401);
      }
    } catch (JWTException $e) {
      // Something went wrong - let the app know.
      return API::response()->array(['error' => 'could_not_create_token'])->statusCode(500);
    }

    // Return success.
    return compact('token');
  }

  public function validateToken(){
    return API::response()->array(['status' => 'success'])->statusCode(200);
  }

}
?>
TodoController
This particular controller will need a method for each todo action: add and delete.
Create a new file controllers/TodoController.php and put the following code in it:
<?php

class TodoController extends \BaseController{

  public function index(){

    $user = API::user();
    $userList = TodoList::find($user->lists()->first()->id);

    if($userList){

      $todos = $userList->todos()->get();

      return API::response()->array(['status' => 'success', 'todos' => $todos ]);

    }

    return API::response()->array(['status' => 'failed', 'message' => 'There was an error. Please try again.' ])->statusCode(401);

  }

  public function store(){

    $validation = Validator::make(Input::all(), [
      'title' => 'required'
    ] );

    if($validation->fails()){
      return API::response()->array(['status' => 'failed', 'message' => $validation])->statusCode(200);
    }

    $user = API::user();

    $userList = TodoList::find($user->lists()->first()->id);

    try{

      $todo = new Todo([
        'title'    => Input::get('title'),
      ]);

      $todo->save();

      if($todo && $userList){
        $userList->todos()->save($todo);
      }

      return API::response()->array(['status' => 'success', 'message' => 'Todo was added!']);

    } catch(\Exception $e){

        return API::response()->array(['status' => 'failed', 'message' => 'There was an error. Please try again.' ])->statusCode(401);

    }

  }

  public function destroy($id){

    $user = API::user();
    $userList = TodoList::find($user->lists()->first()->id);

    $todo = Todo::find($id);

    if($todo && $todo->list_id == $userList->id){

      $todo->delete();

      return API::response()->array(['status' => 'success', 'message' => "Todo was deleted." ])->statusCode(200);

    }

    return API::response()->array(['status' => 'failed', 'message' => 'There was an error. Please try again.' ])->statusCode(401);

  }

}

?>
Testing
Now that we have all the code in place, lets make sure its working correctly.
Manually Create User & Todo List
First you will need to add a user to the database. Run the following SQL command, or manually insert a user into the database:
INSERT INTO `users` (`id`, `email`, `password`, `created_at`, `updated_at`)
VALUES (1, '[email protected]', '[password]', '2015-06-16 02:32:51', '2015-06-16 02:32:51');
Note that we will need to generate a hashed password in place of [password]. Since this is dependent on your installations app key you can generate a password through the artisan tinker command.
- Move to your project directory and run the
php artisan tinkercommand - Generate a password using the following command
echo Hash::make('abc123'); - Copy the output and use it in the password column of your database.
Next, we need to add a new list to the database and associate it with our user. Once we've built the iOS app these lists will be dynamically generated in the database. However, for the purposes of testing we will need to manually add a list. Run the following SQL command, or manually insert a user into the database (assuming your newly created user has the ID 1):
INSERT INTO `lists` (`id`, `user_id`, `title`, `created_at`, `updated_at`)
VALUES (1, 1, 'Test List', '2015-06-16 02:32:51', '2015-06-16 02:32:51');
Generate Token
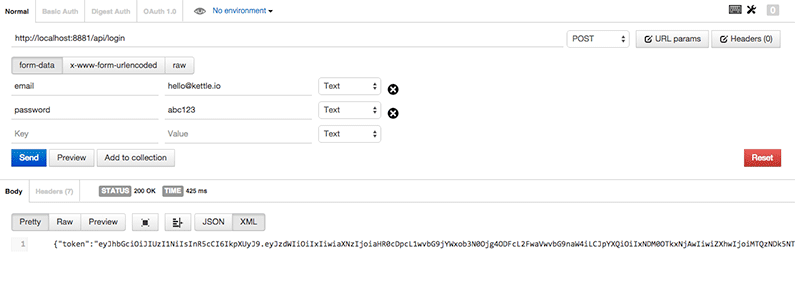
Now that you have created a user and todo list lets go ahead and ensure that the app is creating and validating tokens correctly. For this I prefer to use a Chrome extension called Postman. You'll need to send a POST request to the /api/login route including the email and password. If you recieve a token back, everything is working as expected. You'll use this token to authenticate subsequent calls to the API. It should look something like this in Postman:
Create Todo Item
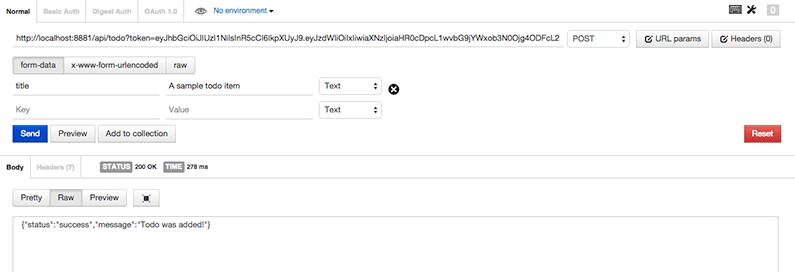
Send a POST request to /api/todo with your token as a query string and the desired todo title as a form input. This will create the todo item in your database and map it to the specified user. For simplicity sake, each user only has one list. It will look like this:
View Todos
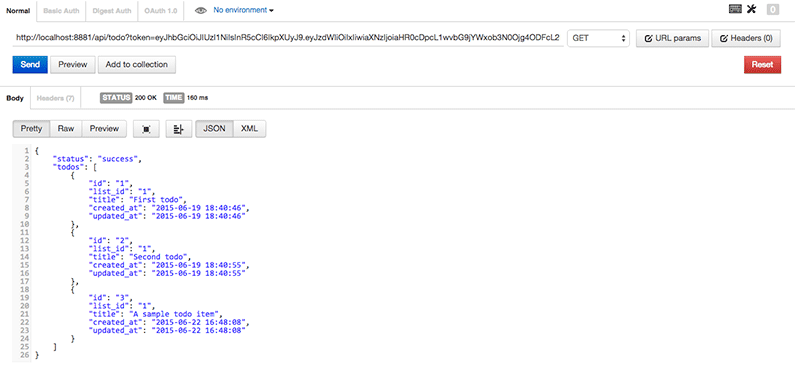
Send a GET request to /api/todo with your token as a query string. This will return a JSON object with all the todo items for that particular user. It will look like this:
Delete Todo Item
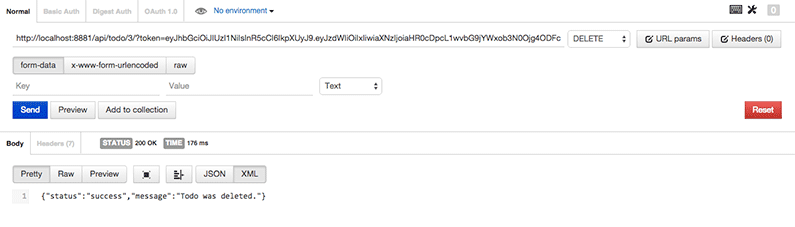
Send a DELETE request to /api/todo/{id}?token=yourtoken - where ID is the ID of the todo item you wish to delete. It should look something like this:
Conclusion
Thanks for reading. Please visit again for our follow up article on the iOS portion of this project.
If you have any comments or questions please leave them below. Remember you can also report issues and download this project directly from our Github.