Welcome!
Today we will be combining the Laravel framework with Google's Angular JS. This has a variety of uses, but our article will show you how to setup posts within a blog. We will be implementing dynamic pagination using the built in Laravel paginate option.
At the time of this post we were unable to find existing documentation on this approach. We are making this post in hopes that you find it helpful. The entire code can be found on our GitHub.
Tools
For this article we will be using the following tools. It's important that you are familar with the frameworks in order to use the system to it's full advantages.
- AngularJS JS framework (we used 1.3.0)
- Laravel PHP framework (we used 4.2)
- Twitter Bootstrap - HTML/CSS framework
Let's Get Started
I'll assume that you already have a standard installation of Laravel up and running. If you need to do that first, their site provides a great quickstart guide.
Create Routes & Views
First we will create the routes and view needed to show your blogs posts. We'll build something simple using the grid styles provided by Bootstrap. You can customize this later once the system is hooked up. In this example we'll include 5 posts and next/back buttons.
Inside the routes file we will add a route for the JSON data and one for the actual posts page. Add the following to your app/routes.php file.
Route::get('posts', function() {
    return Response::view('posts');
});

Route::get('posts-json', array(
  'as' => 'posts-json',
  'uses' => 'PostController@json'
));
Create a new file called posts.blade.php in /app/views and place the following code in it. Note that we have included the Bootstrap library.
<!DOCTYPE html>
<html lang="en">
  <head>
    <link href="//maxcdn.bootstrapcdn.com/bootstrap/3.3.2/css/bootstrap.min.css" rel="stylesheet">
    <title>My Blog</title>
  </head>
  <body>
    <div class="col-md-6 col-md-offset-3">
      <h2>Posts</h2>

    </div>
  </body>
</html>
Create Database Table & Controller
We will create a new model for our posts. We will name the new model Post. We will also create a new table to save all my posts with some basic structure. We will call this table posts and give it columns for:
- ID (auto-increment)
- Title (varchar, 100)
- Content (varchar, 255)
You should really use php artisan migrate:make create_posts_table here but I won't go into detail on that. Hopefully your familar with the built in migrations.
Now that we have the posts table setup we are going to populate it with some data. For testing I like to use the Faker library. If you are unfamiliar with how to use Faker I suggest taking a look at our article on how to seed a database with dummy data in Laravel.
Now that we have the database table created and populated, lets create a controller for the posts. We will use this to paginate through the posts and fetch their data. We will create a new file in the app/controllers folder and call it PostController.php. Inside we will create a new function json that will geneate the JSON data:
<?php
class PostController extends BaseController {

    public function json(){
        $posts = Post::paginate(5); // 5 is the number of items to show per page
        return Response::json($posts);
    }

}
Create "post" Model
We will now create a post model to connect our new controller to the post table. Create a new file called Post.php in the app/models directory. Inside the new file add the following code.
<?php

class Post extends Eloquent  {
    protected $fillable = ['title', 'content'];
    protected $table = 'posts';
    protected $hidden = array();
}
Add & Configure AngularJS
It is time to add AngularJS to the page and unlock all the potential that this framework can offer. Go ahead and include the library in your page. You will also need to create a JS file to place your code.
<script src="https://ajax.googleapis.com/ajax/libs/angularjs/1.3.2/angular.min.js"></script>
<script src="https://ajax.googleapis.com/ajax/libs/angularjs/1.3.2/angular-resource.min.js"></script>
<script src="js/app.js"></script>
Important!
Laravel's blade templates use the same opening/closing brackets as AngularJS {{ }}. We must configure AngularJS to use [[ ]] instead to avoid conflicts. We can do that by adding the following code to our newly created js/app.js file.
var app = angular.module('kettle', ['ngResource'],
 function($interpolateProvider) {
    $interpolateProvider.startSymbol('[[');
    $interpolateProvider.endSymbol(']]');
});
Configure View File
Now that we have enabled AngularJS lets modify the HTML view to render it. Please note that we have now included ng-app in the body tag. This is critical.
  <body ng-app="kettle">
    <div class="col-md-6 col-md-offset-3" ng-controller="postController" ng-init="getPosts()">

      <h2>Posts</h2>

      <div class="list-group" >
        <a href="#" class="list-group-item" ng-repeat="post in posts" >
          <h4 class="list-group-item-heading">[[ post.title ]]</h4>
          <p class="list-group-item-text">[[ post.content ]]</p>
        </a>
      </div>

      <div>
        <posts-pagination></posts-pagination>
      </div>

    </div>
  </body>
You will notice that we have used the js/app.js file.
app.directive('postsPagination', function(){
return{
restrict: 'E',
template: '<ul class="pagination">'+
'<li ng-show="currentPage != 1"><a href="javascript:void(0)" ng-click="getPosts(1)">«</a></li>'+
'<li ng-show="currentPage != 1"><a href="javascript:void(0)" ng-click="getPosts(currentPage-1)">‹ Prev</a></li>'+
'<li ng-repeat="i in range" ng-class="{active : currentPage == i}">'+
'<a href="javascript:void(0)" ng-click="getPosts(i)">{{i}}</a>'+
'</li>'+
'<li ng-show="currentPage != totalPages"><a href="javascript:void(0)" ng-click="getPosts(currentPage+1)">Next ›</a></li>'+
'<li ng-show="currentPage != totalPages"><a href="javascript:void(0)" ng-click="getPosts(totalPages)">»</a></li>'+
'</ul>'
};
});
Fetch & Parse JSON Using AngularJS
If you remember in the beginning we created the route /posts-json/ to serve up the post information using JSON. Now its time to use it. When you load that page you should see something like this.
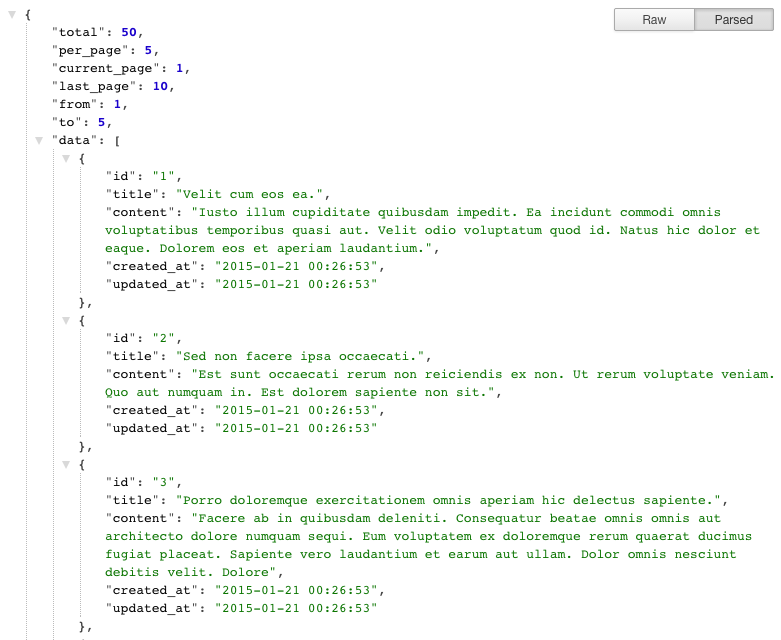
The data key in the JSON is the one that holds the content of all our posts. When we paginate with Laravel all we need to do is add a page parameter to the URL and Laravel will handle the rest. For example, /posts-json?page=2 would yield the second page of results.
Now its time to write the code snippet for AngularJS that will fetch and parse the JSON + enable the pagination functions. This requires that we write a new controller called postController in our app.js file.
Update! We've updated the code below to use pagination with ngResource. We'll leave the old code commented inline, in case you want to continue using that!
app.factory( 'Post', function($resource){
  return $resource('post');
});

app.controller('postController', [ '$http', '$scope', function($http, $scope){

  $scope.posts = [];
  $scope.totalPages = 0;
  $scope.currentPage = 1;
  $scope.range = [];

  $scope.getPosts = function(pageNumber){

    if(pageNumber===undefined){
      pageNumber = '1';
    }
    Post.get({page: pageNumber},function(response){
    // Old pagination style using http
    // $http.get('/posts-json?page='+pageNumber).success(function(response) {

      $scope.posts        = response.data;
      $scope.totalPages   = response.last_page;
      $scope.currentPage  = response.current_page;

      // Pagination Range
      var pages = [];

      for(var i=1;i<=response.last_page;i++) {
        pages.push(i);
      }

      $scope.range = pages;

    });

  };

}]);
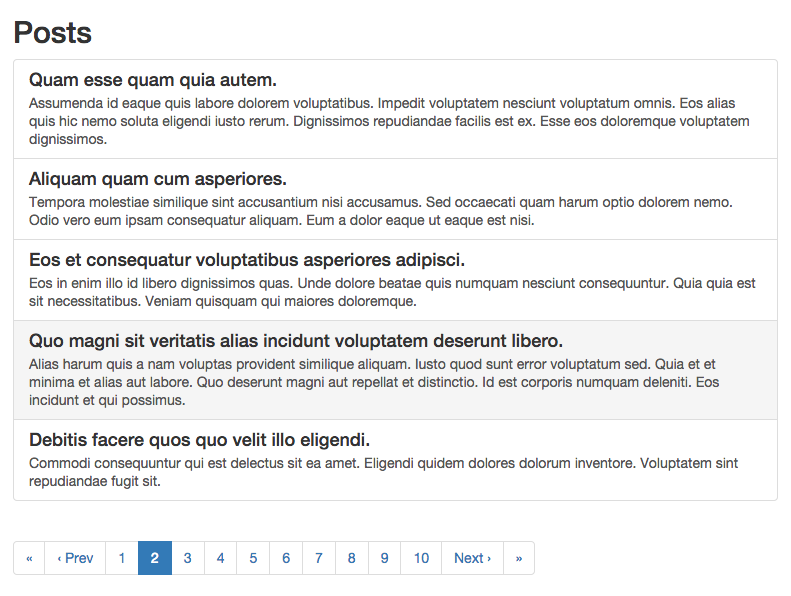
Once you've added this code you should see the final result by visiting the /posts you created in the beginning. If everything went smooth your final result should look something like this:
Summary
We hope this article was helpful to you. If you have any comments please leave them below - thanks!